


Avoiding Sheet Metal DFM Issues
Here are a few of the most common sheet metal design advisories with some steps you can take to eliminate them
Getting a grip on the best practices of design for manufacturing (DFM) for sheet metal fabrication is an excellent way to reduce costs and improve part quality. As many of you reading this are painfully aware, there’s a lot to consider when designing parts, and a misstep early in the process can mean costly rework or potential product failures.
Our online quoting tool helps customers avoid common design gaffes through automated alerts called design advisories. These helpful tips notify the user of part features or callouts that are either questionable or—worst case—downright unmanufacturable.
This design tip looks at the four forming and bending issues that we encounter most often and provides recommendations on ways to improve your part’s design and overall manufacturability. As always, reach out to one of our sheet metal experts if any of the following is unclear, or even if you want to bounce some ideas off them about your next project.
What a Relief
A bend relief is just like it sounds—a means to relieve the forces created when bending sheet metal, which would otherwise cause the metal to deform. For example, pick up a simple L-bracket like the kind you use to mount a shelf. See how the metal is pushed out slightly in the corners? With a bend relief—which is nothing more than a small notch or slit—that won’t happen. Bend reliefs also make it possible for the walls of box-like parts to fit together nicely, and for us to achieve our standard +/- 1-degree bend tolerance. Forget to put them into your part design and you’ll see this informational advisory:
As the advisory indicates, we will place bend reliefs where needed to avoid the unpleasantness just described, allowing us to deliver nice, clean bends. Also, be aware that the thicker the material, the bigger the relief needs to be—figure on a notch no wider than 0.030 in. (0.760mm) and no more than the bend radius (more on this next) plus the material thickness in length.

The Right Radius
Did someone mention the term bend radius? We won’t go into the science of air bending and K-factors and all that other deep stuff here (although if you’re interested, check out this design tip), but we will point out that press brakes use a pair of V-shaped tools, one mounted to the movable ram above (the punch), the other on the bed below (the die), to bend parts. Going back to our wall bracket for a moment, the external radius (the one closest to the wall) is determined by the material thickness and a bunch of other factors. For an inside radius, we will use standard tooling that comes closest to what you put in your CAD model (see chart). For example, if you designed a bend radius of 0.180 in. (4.572mm), we will round that to 0.188 in. (4.775mm). The informational advisory looks like this:

Using one of our standard bend radii will likely have no effect on your part, and it might even save you some time and money. These are our standard bend radii:
| Bend Radius (inches) | |||
|---|---|---|---|
| 0.01 | 0.09 | 0.25 | 0.625 |
| 0.03 | 0.12 | 0.375 | 0.75 |
| 0.06 | 0.188 | 0.5 | 1.0 |
Fine Flanges
What’s a flange, you say? Take the lid off a jigsaw puzzle box and flip it over. See those four vertical edges, without which you'd have puzzle pieces strewn across the floor? Those are flanges, and they're what press brakes produce all day, every day. That said, if the flanges are too short to completely straddle the V in the die mentioned earlier, plus a little bit more for good measure, you’ll see this design advisory:

Here, our DFM analysis is letting you know that the flange in your design is too short. But don’t worry. You don’t have to lift a finger because we will automatically extend the flange to the minimum required bend height (shown in the example above as 0.24") and you can get back to work.
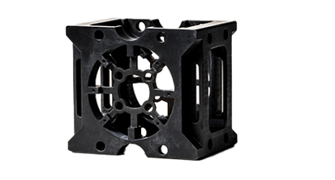
Overlapping Desires
This design advisory is the most serious one of the bunch. In basic terms (and as noted in the image below), it means the flanges overlap. The sides of the box interfere with one another, the bracket, enclosure, or cabinet can't be formed as intended, and there's no way to finish the part. Game over. The challenge, though, is that this problem isn't always so obvious when the part is laid flat, which is why it's important to fold the paper airplane in your CAD software to make sure it will fly. And here again, we might have some ideas to get you out of this jam. We will suggest a solution that will resolve the overlapping bends issue.
If the flanges that overlap are internal flanges, we’ll present you with images of those flanges with mitered corners. If the flanges that overlap are external flanges, we’ll show you a cut through the profile of the part. In either case, all you have to do is accept the presented solution to solve the problem and move forward with your order.
A few more potential issues exist that you can read about in another design tip. It covers issues with sheet metal hole design and the advisories you may get related to it. In any case, most DFM issues are easy fixes, and if they’re not (or seem like they’re not), call us at 877-479-3680 or reach out with an email to customerservice@protolabs.com. We’ll get you fixed up in no time.

If you have any issues getting your guide, click here to download.


