


Why You Should Use Vapor Smoothing on 3D-Printed Parts
Minimize the layered look and texture you find in some 3D-printing processes to improve surface finish with vapor smoothing
One of the perceived drawbacks of some 3D printing processes is that they produce parts that look and feel a bit rough, which is a fair critique. The 3D printing process is all about building parts from one end to the other, layer by layer, fusing new plastic or metal powder onto existing layers with a zap of a high-powered laser. Part layers may be visible in the final product, which is important to remember when aesthetics are a concern. Some designers have shied away from having parts made using SLS or MJF due to these issues, but a recently developed process eliminates some—if not all—of those concerns.
A rather manual—and time-consuming—approach to smoothing was to hand-finish parts or to apply a coating. The latter produces a smooth, but potentially off-spec surface.

Vapor smoothing is a great way to remove rough surface features on certain 3D-printed parts.
Rough Surface Finish? Chemistry to the Rescue!
The “solution” to this issue comes in the form of a chemical solution. The process is called vapor smoothing. It was developed at the University of Sheffield in the U.K., then Additive Manufacturing Technologies (AMT) developed a way to commercialize it, with several European patents granted in 2017.
Hobbyists have often used an acetone-based solution to smooth FDM prints, but that won’t work on parts made using SLS or MJF printing, so more sophisticated chemicals are common now. Here’s how it works:
- In the first stage, parts are cooled to room temperature, hung on a metal rack, and placed in a warmed chamber.
- The air inside the chamber is removed under vacuum, significantly reducing the internal pressure.
- The gases from the boiling solvent enter the chamber and partially condense on any cold surfaces—primarily the room temperature parts.
- The solvent liquifies the part surfaces, reducing roughness and closing off pores. This phase lasts several minutes.
- The chamber is repressurized and warm air blows in. This causes the solvent to condense quickly and drain out of the chamber. It also serves to “cure” the part surfaces.
- Hot air arrives next, evaporating any remaining solvent left on the parts.
What to Expect from Vapor Smoothing Parts
During the process, the vapors comprehensively fill surface cavities with melted plastic. Beyond smoothing the parts, they end up with improved elongation at break. What's more, the vapor smoothing process has minimal impact on the parts' properties, except for a very small drop in stiffness and strength (see Mechanical Properties table).
For well-designed PA11 Black parts, for example, surface roughness is reduced from 250+ μin RA down to between 64 and 100 μin RA. You’re left with a glossy surface close in surface roughness to PM-T2/SPI-D2 injection molded parts. While it will be much glossier than its molded equivalent, it will still have some visible striations.
Mechanical Properties
| PA11 Black | Standard Finish | Vapor Smoothed | ||
| XY | Z | XY | Z | |
| Elongation at Break (ductility/stretchiness) | 30 ± 7% | 18 ± 7% | 120 ± 80% | 75 ± 25% |
| Tensile Strength (UTS)—force required for failure | 52 ± 4 MPa | 49 ± 4 MPa | 51 ± 4 MPa | 48 ± 4 MPa |
| Elastic Modulus (stiffness) | 1800 ± 200 MPa | 1800 ± 200 MPa | 1700 ± 200 MPa | 1700 ± 200 MPa |

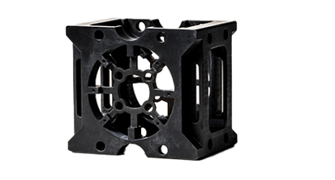
Because vapor smoothing uses a gas, it can even smooth areas in tight spaces, like these.
Design Guidelines for Vapor Smoothing
Because your part will have to hang from a hook on a metal grid, you need to include some sort of element that allows for that. The best way is to create a hole in your part. Doing this will avoid witness lines. Of course, there are other options. If the part has no through hole, we’ll attach a clip to an accessible wall feature. The feature must be roughly 0.040 in. to 0.200 in. (1.016 to 5.08mm) thick to work. However, this will leave visible cosmetic marks on the part. Still no way to attach the hook? We can add a hook feature to your part when we prepare for your build. These are removed after smoothing, but could leave a small, raised dimple on the part surface. We will do our best to accommodate your requests for location and method to add a feature to hook onto.
When to Use Vapor Smoothing
Vapor smoothing works particularly well on nylon parts produced using selective laser sintering (SLS) and Multi Jet Fusion (MJF). In the end, you get parts that not only look better, but also perform better and are less likely to break. Vapor smoothing adds another dimension to post-processing options for 3D printing.
What It Can Do
- Improve cosmetics/smoother surface finish
- Improve tactile feel
- Significantly increase elongation at break
- Improve water tightness/resistance
- Scale to higher quantities and more complex geometries than custom finishing
What It Cannot Do
- Fully mimic an injection molded part surface finish
- Achieve a uniform finish on all surfaces on all geometries
- Hide preexisting part defects caused by printing
- May not be suitable for some applications where off-gassing is highly unacceptable
Currently, we offer this process for SLS parts in PA11 Black/PA850, but other materials and processes will be added soon.
It’s a Gas!
One thing to remember is that vapor smoothing uses a strong solvent. The drying process will remove almost 100% of the smell from each part, but there’s always the possibility that you will still catch a whiff of something like a strong rubbing alcohol when you first open your box. No worries—the smell will dissipate quickly in the open air and the parts are safe to touch.
Vapor smoothing opens up a realm of possibilities for designers who want to work with certain printed plastics but we're concerned about roughness. We hope this fairly technical explanation helps bring the process down to earth. Have a design project in the works? Reach out to us at 877-479-3680 or customerservice@protolabs.com.

If you have any issues getting your guide, click here to download.


