


Designing Sheet Metal Enclosures
Key design considerations and customization options for your sheet metal enclosures
What’s the first thing your customers see when they look at your products? It’s not what’s inside. It’s likely the enclosure, and that first impression speaks volumes about how you want your product to be perceived by customers. An aesthetically pleasing enclosure goes a long way toward saying that you’ve thought a lot about how the product will look in your customer’s space.
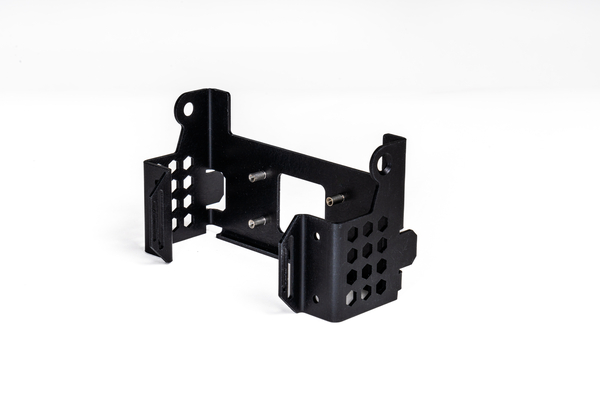
But enclosures are not just eye candy. Enclosures are functional. They are like a tough exoskeleton that protects all the vital stuff inside (such as precision electronics), preventing dust, dirt, and corrosive moisture from infiltrating the inner spaces. They can provide structure that places parts safely in strategic locations and provide much needed ventilation. Some include internal elements that can hold assembly components in place.

One consideration before you start designing an enclosure is to look carefully at what needs to go into it. No one wants a giant box holding a small number of components. By the same token, jamming components into a small space can look haphazard, and depending on your ventilation needs, might even cause cooling issues. A bit of thought will get you just the right sized enclosure.
Next, think about manufacturing choices. If you look around you, you’ll see that almost every consumer electronic, medical, or aerospace product uses sheet metal for enclosures. It’s easy to see why. Sheet metal enclosures can be fabricated quickly (sometimes in as little as 3 days), inexpensively, and with looks that can range from rustic to highly finished. That’s also why sheet metal is an ideal choice during the creative burst of ideas inherent during prototyping.
Design Considerations for Sheet Metal Enclosures
Design for sheet metal is quite different than design for other manufacturing processes. For one, you’re starting from a flat slab of metal which must be bent, punched, or laser cut into very specific shapes. Always remember that single sheet idea and how bends in one area can have a profound effect on manufacturability, and ultimately, the success of the enclosure. Here are some things to think about when designing sheet metal enclosures.
Form and Fit
One of the trickiest factors of the prototyping process is ensuring your design fits together and can be assembled. Small errors like forgetting a clearance hole for tooling to access a fastener or designing components to mate face-to-face in a bent corner, can add substantial cost and time to your project, as you have to move back to the design phase to fix these errors and remanufacture the next revision.
Tooling access is important because ultimately, a collection of standalone parts does nothing for you if they can’t be assembled into their final form. If you can’t get a screwdriver into a corner to torque your fasteners during assembly, you aren’t going to make much headway towards a final product. Besides fitting a tool into a tight place, it is imperative that your design includes a hole in both components to be fastened. In a fast-paced environment this is an easy mistake to make and it brings an iteration to a grinding halt.
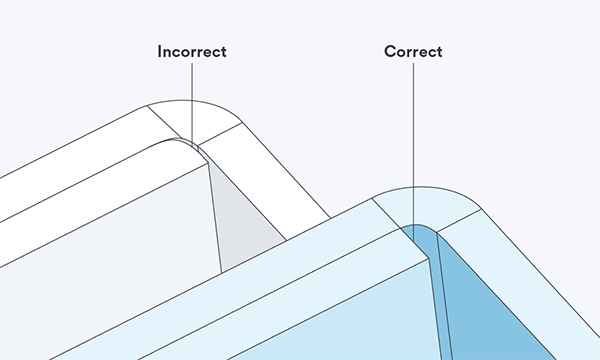
Many designers who aren’t well-versed in sheet metal will forget that formed corners will have a radius. Engineers have designed parts that mate face-to-face and when the design is turned into sheet metal and a bend radius is added—0.030 in. (0.76mm) inside bend radius is most common—the components that are mated run into an interference in the bend region. A best practice is to add inside bend radii to your parts as you design them and plan your mating components to meet and secure before the bend region.
U-Channels
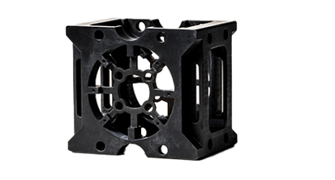
These are exactly what the name suggests—U-shaped channels made of sheet metal that can provide something as simple as a groove through which electronic cabling can safely pass. They can be used as strong support for architectural elements or as a bracket to hold elements of an assembly, too. One rule regarding U-channels is that the ratio of width to height must not exceed 2:1.
Ventilation Allowances
Enclosures for electronics get hot. The best way to mitigate that buildup of heat is through ventilation, whether the airflow is forced by using fans or naturally with open areas allowing heat to escape through convection. The need for ventilation has some significant effects on design and manufacturability. Perforations or louvers in your design create an open area that allows for air flow while preventing ingress of tools and fingers during handling and use. There are some options and alternatives you can consider when designing ventilation.
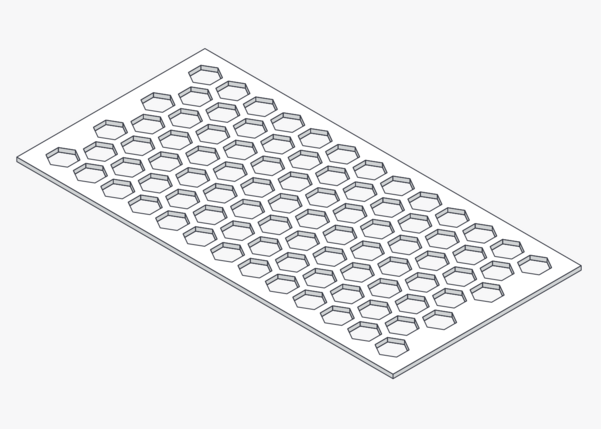
Perforation patterns are a graceful way of adding airflow to your enclosure. They are a pattern of holes, typically round or hexagonal, that are staggered and sized in a way that achieves an open area percentage that dictates the amount of flow. This is ideal for small areas of airflow as, once you start punching or lasering a large perforated area, there tends to be a significant amount of distortion added to the sheet. However, if you must incorporate a large perforation pattern there are two ways you can minimize or eliminate the sheet distortion.
- Consider a sheet of perforated material tack welded into your enclosure. Perorated material is punched stock that has been flattened by the mill or vendor. This route includes a touch of welding and adds the cost of extra material but virtually eliminates the deformation concern.
- Use the smallest possible open area percentage that serves your airflow needs. This method may not eliminate the possibility of distortion but it will go very far to minimize it.
Bend Radius
Sheet metal is bent using a press brake which uses tons of weight to bend your chosen materials. A punch, which looks like a pointy tip, works in conjunction with a die. The punch lowers down onto the metal workpiece, which sits atop the die and is then deformed by the tons of weight as it’s pressed into the die. The bend is never a perfect, sharp angle. Instead, the punch/die combination adds a slight curvature called a bend radius, both on the inside and outside of your material. You can choose how large the bend radius is in your designs, but you do need to compensate for this in your designs. For example, if you want a component to fit into that bend, match the component’s external bend radius to the internal bend radius of the chassis to ensure a good fit. Note that external radii are inextricably linked to the material being bent and its thickness.
Formability Considerations
This goes back to the basic premise of sheet metal fabrication. You are bending a single sheet of metal. For example, while the top of a cardboard box is made of a single sheet of cardboard, it has material cut out of each corner area to facilitate bending of the flaps. Without that, the lid won’t work as intended. Or let’s say you want to create a flange in your workpiece. First, you’ll need to cut the flange material into a bendable form, but if you try to bend it at this point, you’ll likely deform the surrounding metal. To avoid that, you add bend relief, which is no more than a slight cut into the area of the flange where it meets the rest of the workpiece. With that in place, the bend will be successful, by avoiding deformation of the main area of the workpiece.
Bottom line: If you design your sheet metal part as a solid object, it’s important that you send us a CAD file that appears folded but shows where bends should go to ensure manufacturability.
Materials for Sheet Metal Enclosures
These three materials are the most often chosen ones for sheet metal enclosures. Here's a quick overview of each:
Aluminum
his lightweight yet strong metal is very commonly used for enclosure prototypes and even end-use parts. Available in three types (5062-H32, 6061-T651/T6, and 5754), it’s easy to form, has great corrosion resistance, and is highly weldable. Post-processing can add some nice aesthetics beyond the already-appealing raw aluminum.
Stainless Steel 304/304L, 316/316L
Two additional popular choices for enclosures. Stainless steel is not hard to form or weld, and is strong, corrosion resistant, and durable, although it’s best to avoid saltwater environments with 304. On top of all that, it looks great.
Steel
Available as Low Carbon Steel CR 1008, and as pre-plated Cold-Rolled Galvanized and Galvannealed steel, these materials are cost-effective options that are suitable for welding, forming, and are durable and strong. Note that CR 1008 is uncoated, so it is highly susceptible to corrosion, unlike galvanized and galvannealed steel. For prototyping, 1008 will work fine, but for other applications, it’s best to coat using zinc or powder coating for protection.
Secondary Operations for Enclosures
Assembly
Assembly is crucial in sheet metal fabrication because it brings together the individual components into a complete and functional product. It dictates the final quality, dimensional accuracy, and structural integrity of the product, ensuring that all pieces fit correctly and perform their intended function. Proper assembly techniques, like welding, riveting, or fastening, are therefore essential for creating a durable and reliable end item that meets design specifications.
Hardware
Panel fasteners and other types of PEM® hardware are used to bolster parts or provide threads for assembly. One thing to be aware of here is that, depending on the kind of plating the part will receive after fabrication, as well as the type of material it’s made of, the insert may need to be installed before or after any post-processing operation. This is one area where you definitely want to check with us before pushing the “accept” button.

Masking
Masking is most often done to ensure good ground location(s) for your electronics. It is important to remember, however, that if you mask a finish the underlying material will be bare. It may be in your best interest to plate with a conductive finish such as chromate (on aluminum) before your insulating finish, such as powder coating.
Part Marking
Part marking can be done with epoxy ink and stencil using a stencil font, or it can be done with a variety of laser marking methods. Engraving, which removes material to create a deep permanent mark, marking, which transforms the surface to produce a white or black mark, and finally etching, which ablates a small amount of plating to produce a white mark.

Welding
Welding allows the creation of a huge variety of designs which cannot be achieved from a single piece of sheet. The primary concerns about welding are deformation, and requirements of light, or fluid, tightness.
Note: if your design requires light or fluid tight welds, it is best to seek specialized welders that can achieve and test for it. This is not a service that Protolabs offers.
If your design has a large amount of welding, there is a real concern that the part will warp from the heat required. This is particularly an issue with material thicknesses less than 0.062 in. (1.57mm). Instead, consider the stitch weld. This is most commonly 1 in. (25.4mm) of weld every 3 in. (76.2mm) but that size and pitch can be adjusted to achieve the minimum weld input that will produce the strength that your design requires.
Surface Finishes for Custom Enclosures
Laser Engraving
As the name suggests, you can use high-powered lasers to inscribe information on your sheet metal parts. This is one way to incorporate logos, part numbers, and other ideas crisply into your parts.
Wet Paint
After application of a primer layer to improve adhesion, a liquid coating in your own chosen color is applied to your part, providing an appealing finish.
Powder Coating
In this process, powdered pigment is sprayed onto an electrostatically charged surface to which it sticks. After a trip to the oven, the powder becomes a strong ceramic-like coating that looks great and protects your metal.
Silk Screening
Most any basic image or text can be printed onto a sheet metal part. While not a protective coating, silk screening allows you to print user instructions, logos, and more, to provide more complete parts that can include your branding.

Plating and Coating
These allow you to create a protective layer on your sheet metal that can yield aesthetic results, too.