


Mechanical Fastening Methods for Metal and Plastic Parts
Turning individual parts into assemblies using hardware solutions
Benefits of Various Mechanical Fastening Methods
Designers tend to take lots of time considering the appearance and functionality of their products and the manufacturing methods needed to create them, all of which are certainly important. But sometimes, figuring out the best solution to ensure that the parts will attach to one another as a complete assembly ends up an afterthought.
These connections can affect durability, functionality, and repairability of your product. Also, they can affect compatibility and cost. For this design tip, we’ll cover all four of our manufacturing processes—injection molding, CNC machining, 3D printing, and sheet metal fabrication and discuss various solutions available.

The good news is that there are all sorts of fastening solutions—it’s just a matter of finding the best one to address your assembly’s needs. Fundamentally, there are two broad categories of fasteners: temporary and permanent. The former allows for disassembly for repairs, while the latter provides enhanced structural integrity.
Threaded Fasteners
Threaded fasteners, such as bolts and screws, are the cornerstone of temporary mechanical connections. Their primary benefit is the ease of installation and disassembly for repairs or upgrades, avoiding component damage. A potential downside is their susceptibility to loosening during vibration, which often necessitates the use of locking washers, thread-locking compounds, or specific anti-vibration features in the CAD model itself.
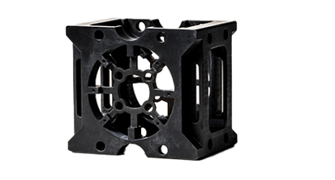
Design Considerations for CNC Machining
There are two approaches we can take with manufacturing your parts. First, here's the basic design schema to add threaded fasteners:
- CNC machining allows for the direct incorporation of highly precise threads, but the designer must select the appropriate type of thread (e.g., UNF, UNC, metric) and specify the minimum thread engagement depth.
- When designing parts to be threaded, the CAD model requires pilot holes slightly less wide than the minor diameter of the thread.
- A crucial consideration is the material. Softer metals like aluminum benefit from deeper thread engagement (typically 1.5 to 2.5 times the fastener diameter) to prevent stripping, which directly influences the required wall thickness in the CAD model. That said, you are limited by the depth of the part and must avoid exceeding the limits regarding depth of the mill that creates the pilot hole. Here's a set of helpful guidelines to help with machining threaded holes.
If you have higher requirements, we offer "Advanced Options" in our digital quoting software. These include drawing reviews, expanded thread options, hardware installation, and more.
Design Considerations for Injection Molding
Direct threading in plastic is generally weaker than in metal, but it is highly cost-effective and suitable for low-load applications. When using self-tapping screws (designed to cut their own thread), the plastic part must be designed with a precisely sized boss. The boss—the cylindrical feature that houses the screw—has to adhere to strict design for molding rules, paying attention to wall thickness and the screw’s outer diameter.
Also, don’t forget to add draft on the walls to allow the part to eject cleanly from the mold. Keep in mind, though, that we’ve all experienced stripped threads in plastic parts, so it’s a good thing that there are better solutions we’ll discuss later. Here are more details if going the plastic thread route makes sense for your situation.
Design Considerations for Sheet Metal Fabrication
For sheet metal, direct threading is rarely possible due to the material’s thin gauge. Instead, designers tend to use self-clinching fasteners (e.g., PEM nuts or studs) or cage nuts. The CAD model for the sheet metal blank requires a precisely sized, simple hole. Self-clinching fasteners mechanically lock the fastener into the sheet using an installation press. Note that you have to consider the sheet thickness and ensure an appropriate edge distance. These must be clearly dimensioned in your CAD model.
Panel fasteners are a type of clinching hardware that replaces the loose nuts and bolts seen with conventional loose hardware assembly. These fasteners allow the screw component to be permanently fixed into a mating component that is frequently removed and reinstalled. There is an enormous variety of these fasteners available with tool or finger access, smooth or knurled bodies, and different powder coat and plating options.
Rivets
Rivets are essentially a permanent piece of hardware for assembling parts. They are a popular choice when working with sheet metal because their thin profile fits in perfectly with what are typically thin pieces of sheet metal. Rivets have high tensile strength and shear, are incredibly simple to install (assuming your design provides room for the tool), and are mostly vibration resistant. Compared to welding, rivets don’t deform sheet metal or introduce corrosion points.
From a designer’s perspective, you just need to add a through-hole into the two sheet metal areas where you want the rivet installed. If you are installing these yourself, consider the diameter of the hole to ensure a snug fit, as well as the length of the hardware. Sounds simple, right? But if you place the rivet too close to an edge, or too close to another rivet, you may compromise the assembly should the parts encounter substantial forces.
Another consideration, intimated earlier, is that the rivet tool needs space to do the installation. If a bend (or another part) covers the hole, you’ll be left shaking your head because the rivet can’t be installed. That said, if only one side is accessible, you can use a blind pop rivet, a nifty option that lets you do the job quickly and with little effort.
If aesthetics is a concern, you should know that rivets will be a visible part of your assembly, but so are weldments unless they are hidden by the overall build. If cost is a factor, riveting certainly has lower labor costs than welding. Last but not least, you should know that rivets are not as strong as properly executed weldments, especially when forces try to pull both sides apart.
You should carefully research the rivet you intend to use when designing a riveted assembly and make note of the hole-size range appropriate for the hardware. With sheet metal, it’s best practice to design toward the maximum end of the recommended hole size. This will allow for a few thousands of an inch for misalignments due to the unpredictable nature of sheet metal tolerances.
Note that there are many hardware options available for combining parts into sheet metal assemblies.

Inserts
Inserts are the designer's answer to creating a robust, reusable thread in materials that are otherwise too weak to support a direct thread, such as plastics, composite materials, or soft metals. They effectively transfer the load from the fastening bolt to the host materials over a larger surface area.
Threaded Inserts for Injection Molding
The most critical fastening problem in injection molding is ensuring thread integrity for screws that will be repeatedly removed and reinserted. If you choose to use a direct plastic thread, it will likely fail quickly for the reasons noted above. Inserts solve this issue by providing a robust thread. There are two ways to install them in your parts.
Insert Molding
Insert molding is the preferred method of adding inserts for higher order quantities. The insert is placed into your mold, and the resin is injected around it. This method yields the strongest joint because the plastic flows completely into the insert's features. To include an insert, first check to see what we stock. This page includes CAD files of each insert. Then, you’ll need three CAD files: one of the plastic part, one of the threaded insert alone, and the third is a model of the full plastic part with the insert installed to show location. Using insert molding adds cost to the mold tool but reduces assembly labor.
Heat Staking/Ultrasonic Installation
After your part is removed from the mold, the insert is installed into a pre-molded receiving hole (boss) using heat or ultrasonic vibration, melting the plastic locally to bond with the insert. The boss is designed with a receiving hole slightly smaller than the insert's outer diameter to ensure a snug fit, but it’s important (and mandatory) to add some lead-in draft to improve installation outcomes. In your CAD model, ensure that the location for your insert has enough material around the boss to handle installation pressure. Remember to include a 2D drawing that shows which insert you want to use and where it is located.
Ultrasonic installation deploys high frequency acoustic vibrations to a localized area of your molded part to press fit inserts into it. It’s a popular process for medical devices, automotive parts, aerospace components, and electronic assemblies.
Note that you don’t have to specify heat staking or ultrasonic installation. We’ll evaluate your materials and take care of that for you.
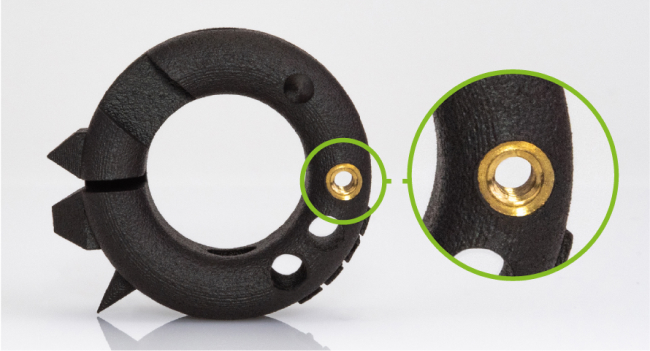
Threaded Inserts for 3D Printing
As with molded parts, heat stake inserts are an excellent way to offer a strong thread for your parts.
For plastic printed parts, the part is designed with a hole to accommodate the insert. The insert is placed into the hole, and a soldering iron is applied to warm the insert and the surrounding plastic, which melts and forms a strong bond with the insert.
Threading in Metal 3D Parts
There are three methods of adding threads to 3D-printed parts: tapping, chasing, and printing. The first two are done post-build and true to its name, printing threads happens during the build.
Tapping creates new threads in a printed part using a sharp cutting tool called a tap. The part is printed with a hole in place, and you can manually add the threads using the tool. To save a lot of time and effort on your end, parts can be tapped mechanically on one of our CNC machining stations for addition of the threads.
Chasing cleans up or corrects existing threads that are rough or damaged by using a similar tool. Chasing is a less aggressive process for repair or refinement compared to tapping. You can hand-chase to create threads, but it might not achieve the kind of accuracy you need. The better alternative is to use our CNC machining after the part has been printed.
One rarely used option is Heli-coils, which are sometimes used with a softer metal like aluminum when stronger threads are needed to lessen the chances of stripping.
While you can print threads in your part, called as-printed threads, you’ll get mixed results. Screws and bolts require smooth threads to rotate easily and bond securely. Sometimes that means creating support structures for the threads to reduce the chances of overhang, and you have to be incredibly cognizant regarding minimum feature size limitations for your chosen printing technology.
Heli-coils and Key Inserts for CNC Machining
Heli-coils (coiled wire inserts) and key inserts (aka Keensert or keysert) are commonly used in CNC-machined metal components, particularly with lightweight materials like aluminum, for two main reasons:
- Repair: Use them to repair stripped threads in an expensive component.
- Reinforcement: Add to the original design to make threads stronger, ensuring that the bolt will fail before the thread in the material.
Plan Ahead for Best Results
The selection of a fastening method shouldn’t be a post-CAD decision. It should be incorporated into the first stages of prototyping. Whether you are adding a drafted boss for an ultrasonic insert on an injection-molded housing, defining critical edge distances for rivets on a sheet metal frame, or creating a pilot hole for a Heli-coil in a CNC-machined block of aluminum, the CAD geometry must reflect the assembly process.
By understanding the strengths and weaknesses of temporary (threaded) and permanent (riveted) connections, and by using inserts to create robust joints in low-strength materials, you ensure that the transition from digital model to physical product is seamless, cost-effective, and reliable. This design approach transforms a collection of individual parts into a truly cohesive and functional product assembly.


